Now to share Part 2 of "Organize that Closet"...
1. After you have organized your clothes, did your donating, contemplated on the consignments and tossed a few bad sweat pants - if you're on the fence with blouse or low riders, take a post it "flag" and stick it on the hanger. If the flag is still there next year...donate!
2. Post it your shoe boxes as well. A brief description of which shoe is the box makes less mess.
3. Never leave your clothes in dry cleaner plastic bags, it does not allow the materials of your clothing to breath and your clothes will smell like dry cleaning chemicals after a while.
4. If at all possible, do a seasonal change of closets. I store all of my winter clothes in the XX-large hefty bags and then rotate when spring and summer comes along. Don't forget to use "under your bed" as storage!
Read Part I of "Organize that Closet"

Tuesday, December 27, 2011
Snowflake Napkin Rings, Trivet and Votives


Crate & Barrel had these out years ago and now they are floating around in the thrift stores! I managed to round up a trivet, 2 votive holders and 6 napkins rings. All in great shape and thought I'd use them all winter long...the only dilemma? What color? With Rust-Oleum Painter's Touch Ultra Cover 2X the color palette is broad and I had a tough time deciding...I posted the before pic on facebook at PaintIdeas Angie and the winner is Satin Aqua! What could be better than light blue snowflakes in the middle of winter?
Project Steps
*Find a spot safe for spray painting - cover nearby items with drop cloths or old sheets to protect them from spray mist
*Lightly spray Rust-Oleum Clean Metal Primer
*Allow to fully dry
*Spray two light coats of Rust-Oleum Painter's Touch Ultra Cover 2X in Satin Aqua
Project Materials
*Metal Napkin rings, votives & trivet
*Rust-Oleum Clean Metal Primer
*Rust-Oleum Painter's Touch Ultra Cover 2X Satin Aqua
*Drop cloths
Organize that Closet...Finally!
Yes, it's that time of year again...to clean out and organize your closet! I'd like to share a few simple tips that have helped me tremendously part my ways with clothes that I will never wear again but will donate and make someone very happy with their new find!
*Distinguish clothing and shoes that you wear and the for sure items that you will never wear again
*Golden Rule of Thumb for the above - if you have not worn it this past year, donate it
*Stop hanging on to those skinny jeans - donate again! When you hit your goal weight, you'll want to treat yourself to a new trendy pair of jeans anyway!
*Check with your local consignment shops as well. It's okay to make a few bucks on a piece of clothing that you paid a fortune for! Donate the rest!
*Be sure to reorganize your clothes, hang items you use frequently at eye level and rarely used items on the upper shelves.
*Save those clear shoe tubs or even shoe boxes - they are great for your bikinis, socks, belts and scarves.
So, stay tuned for a few more quick, realistic organizational tips this week!
Read Part II of "Organize that Closet"
Winter White Picture Frames


 Thanks to one major retailer for clearancing these solid wood picture frames for $1.54 each! I will say that I did not take to the sage green scrolling around the front frame. So as with everything, I decided to invest $3.97 on a can of Rust-Oleum Painter's Touch Ultra Cover 2X in Satin Blossom White and magic happened!
These frames went from one sagey style to a winter wonderland of pictures. I am thinking I will be adding winter pictures of the kids and dogs sledding and making all of those snowmen!
Project Steps
* Find a spot where it is safe to spray paint; cover nearby items with drop cloths or old sheets to protect them from spray mist
*Wipe off picture frames, remove glass from fronts
*Apply Zinsser B-I-N Primer - allow to cure one hour
*Apply wwo light coats of Painter's Touch Ultra Cover 2X in Satin Blossom White
*Allow to fully cure 24 hours
*Fill with fantastic winter pics of family fun
Project Materials:
*Picture frames in need of a face lift
*Zinsser B-I-N Primer
*Painter's Touch Ultra Cover 2X in Satin Blossom White
*Drop cloths
*Fun, winter pictures
New Year's Eve Centerpiece


 Ring in "2012" with all of those unwanted and outdated vases that have been just sitting around in the basement! I did add a few filler vases from my local Goodwill for a grand total of $1.25 for all four vases! My big purchase was the Universal spray paint - three cans and still have plenty leftover for yet another project! I added the tin house numbers for under $7.
Consider adding in fresh flowers such as white peace lillies or simple red roses! Adding candles inside the "2012" front vases luminates the numbers nicely. If you wanted to keep it simple, you can just spray the four vases and glue on the 2012 and use that as a hostess gift as well!
Project Steps
*Wash & Rinse your vases. Dry well
*Cover nearby items with drop cloths or old sheets to protect them from spray mist
***QUICK TIP: Stuff each vase with newspapers so you do not spray the inside of the vases. This allows you to fill with water & fresh flowers or candles
*Apply Universal's Primer - for all surfaces
*Allow to dry 24 hours
*Apply two light coats to each vase in Universal's Gloss Black, Gloss White & Metallic Titanium Silver
*Using a hot glue gun, glue on the 2012 numbers to the front of the vases
*Fill with candles & flowers
Project Materials
*Various Vases
*Drop Cloth
*Universal Primer
*Universal Spray Paint in Gloss Black & Gloss White
*Universal Spray Paint in Metallic Titanium Silver
*Newspapers
*Tin Numbers 2012
*Hot Glue Gun
*Fresh Flowers & Candles
Thrift Store Score - Cherry Red Medallion Wreath
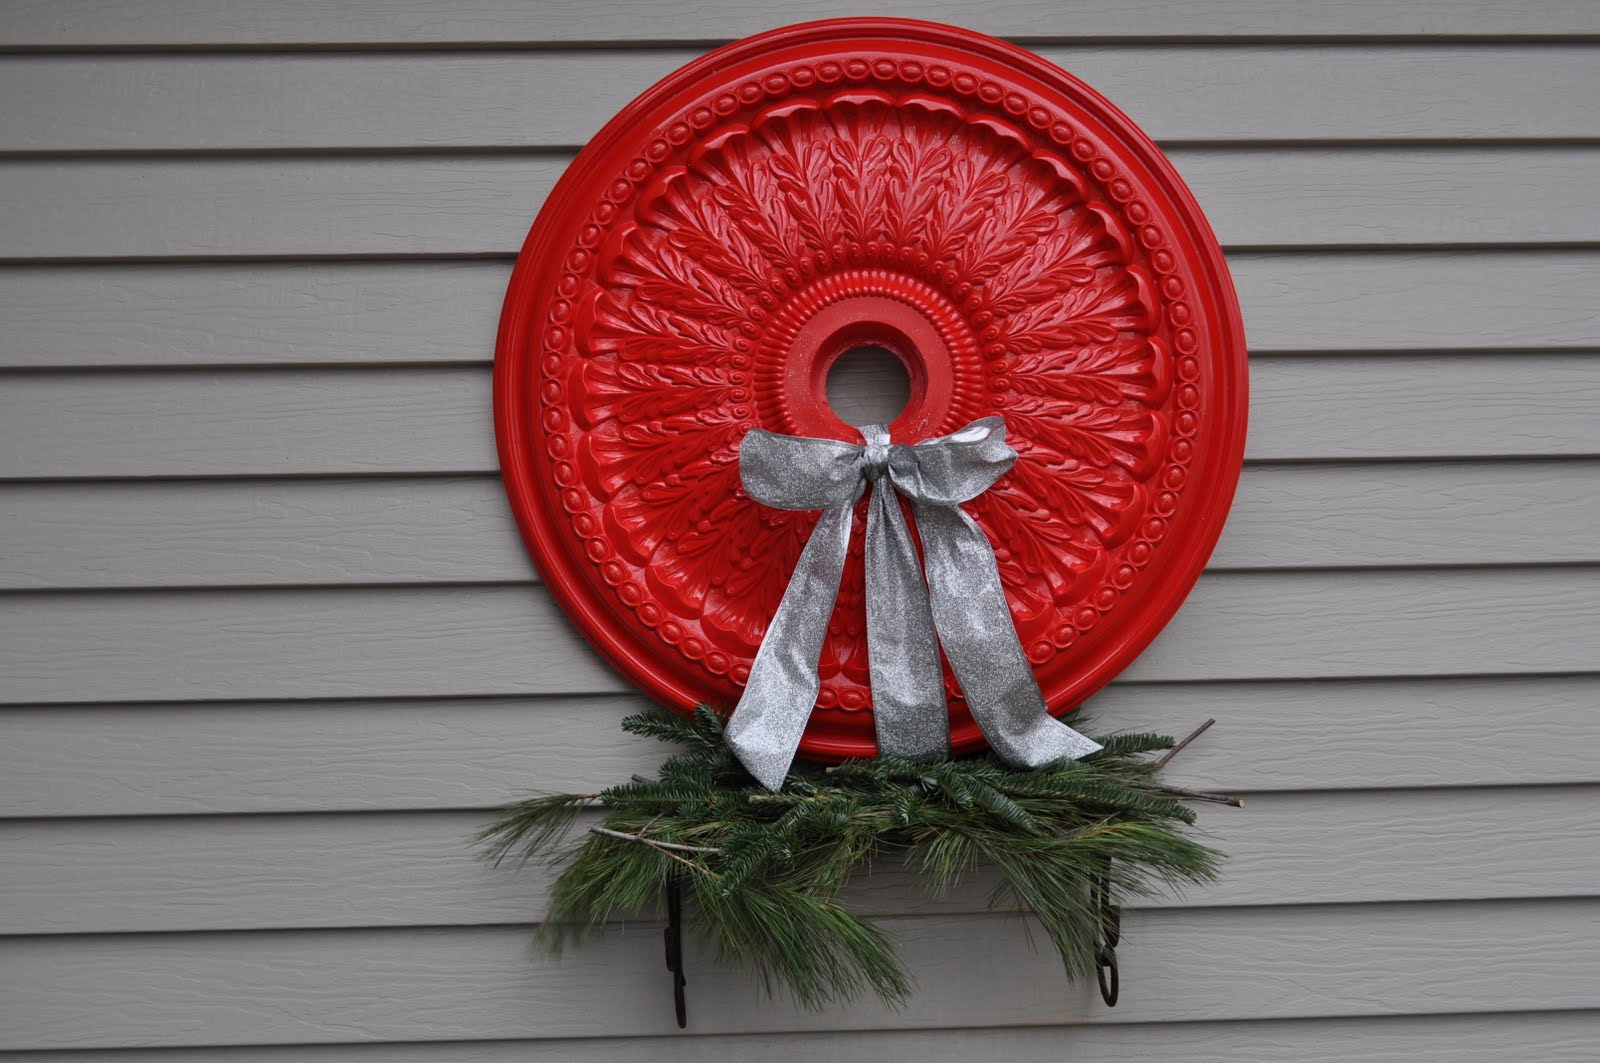 This is my "Thrift Store Score" for the month. I grabbed this builder's ceiling medallion for $4 at my local Good Will! I was looking to make a bold statement and went with Rust-Oleum's Stops Rust in Cherry. Even though the medallion is not metal, I was determined to use the Cherry color - it worked and wow is it stunning!
Project Steps
1. Wipe off medallion with paint thinner - this one had lots of dirt in the crevices
2. Wipe off with a clean rag
3. Spray with Zinsser BIN Primer
4. Allow to fully dry one hour
5. Apply two to three light coats of Rust-Oleum's Stops Rust in Cherry
**Quick Tip - Be sure to allow at least 35 to 40 minutes in between coats - I even applied one coat and after 48 hours went back and applied the final two
6. Once fully dry - about 24 hours tie on decorative ribbon
Project Materials
- Decorative Ceiling Medallion (mine was 52")
- Zinsser BIN Primer
- Rust-Oleum's Stops Rust in CHERRY
- Decorative Ribbon
- Paint Thinner
Wednesday, December 21, 2011
Holiday Decorating Tip: REPURPOSE
Repurpose..Repurpose..Repurpose! Gather all of your large vases and bowls fill them with fresh fruits such as bright red and green apples, pomegrants and veggies - yes, veggies - artichokes make a grand statement in a bowl mixed with hot red chili peppers. For a dramatic centerpiece, dig out all of your candlesticks and candelabras - place them in a grouping in the middle of your table and fill them with the same color, solid candlesticks and pillars. Add a rustic element and place pinecones, cinnamon sticks and fresh evergreen clippings around the table as well. Mother Nature's price is always right!
Friday, December 16, 2011
Frosted Sea Glass Menorah

Enjoy your Hanukkah this season with a homemade menorah! Customize your very own Festival of Lights with a few glass bottles, Rust-Oleum's Specilalty Frosted Seaglass Spray Paint and blue candles.
Projects Materials
- 9 Glass Bottles - recycling is great!
- Rust-Oleum's Specilaty Frosted Sea Glass spray paint
- 9 Blue candles
- One Decorative Star of David Patch
- Acetone
Project Steps
1. Wipe off all of the glass bottles with acetone
2. Cover nearby items with drop cloths to protect them from spray mist
3. Lightly spray on 2 to 3 coats of the frosted sea glass to each bottle
4. Wait 20 to 30 minutes in between coats
5. Allow to dry a full 24 hours
6. Glue on Star of David Patch
7. Wedge in Candles
Happy Hanukkah to All!
Thursday, December 15, 2011
Gold Metallic Angel Ornaments
 For my weekend craft warriors - these are perfect to make in mass amounts with our without kids! Great for gifts to your teacher, mailman, community worker, etc.
Project Steps:
Spray in a covered area - to avoid oversprayLine up the mini wooden pots and spray them all with Rust-Oleum's Metallic Gold Spray Paint
Two light coats will be perfect - 30 minutes in between coats
Line up the 1" wooden balls and spray paint them with Universal's Satin White - two light coats - 30 minutes in between coats as well
Allow to fully dry 24 hours
Glue white head onto inverted pot. Dress up with ribbon for wings, straw for hair, white pipecleaner for halo and hot glue on the back an ornament hook!
Materials Needed:
Rust-Oleum's Metallic Gold Spray Paint
Universal's Satin Spray in White
1" Mini Wooden Pots1" Wooden Balls
Decorative Ribbon
White Pipecleaner
Natural straw for hair
Hot Glue Gun
Ornament Hooks
Thursday, December 8, 2011
Natural Birchwood Winter Centerpiece

This natural birchwood centerpiece can take you right through the winter season. Best part of this project is that you can change the ribbon and decorative butterfly to co-ordinate with your settings!
Project Steps:
1. Cover nearby items with a drop cloth or old sheet to protect them from spray mist
**Quick Tip - Lay birchwood logs into an old box and spray inside
**Quick Tip - Lay birchwood logs into an old box and spray inside
2. Spray two to three coats of Universal's Pure Gold
3. Spray each coating within one hour of each other
4. Allow to fully cure 24 hours
5. Wrap three logs with decorative ribbon and add on your favorite or themed adornment
Project Materials:
- 3 Birchwood Logs
- Universal's Pure Gold
- Decorative Ribbon
- Adornments to decorate along the log
Stunning Holiday Silver Wreath

What a great way to welcome your holiday guests at your front door! Turn a ceiling medallion into a retro wreath and add that perfect zebra ribbon as a final touch!
Project Steps:
1. Cover nearby items with drop cloth or old sheets to protect them from spray mist
** Quick Tip - you can use an old box to spray in as well - lay medallion into box
2. Spray two to three light coats of Rust-Oleum's Metallic in Silver
3. Be sure that each coat of paint is within an hour of each other
4. Allow to fully cure 24 hours
Project Materials:
- 20 Inch Ceiling Medallion
**Quick Tip - check your local home/hardware centers clearance section for these- One can of Rust-Oleum's Metallic in Silver
- Decorative Ribbon
Wednesday, December 7, 2011
Faux Wood Grain Ornament

Recycle & revamp your old ornaments! Turn them from that stark snow white into classic wood grain ornaments using Rust-Oleum's Metallics Spray in Aged Copper!
Project Steps:
1. Find a safe spot to spray paint - always cover items with a drop cloth to protect them from spray mist.
**Quick Tip - I sprayed my ornaments in my garage, covered everything around and used a shoe box - placed plastic cup with ornament right inside.
2. Spray your old ornaments with Rust-Oleum's Metallic Spray in Aged Copper
**Quick Tip - I sprayed my ornaments in my garage, covered everything around and used a shoe box - placed plastic cup with ornament right inside.
2. Spray your old ornaments with Rust-Oleum's Metallic Spray in Aged Copper
3. Two Light Coats will do the trick!
**Quick Tip - Place ornament into a plastic cup, spray one side - allow to fully cure and turn ornament on other side, spray again.4. Using Glitter Glue (which is thicker then Elmer's Glue) start making lines and long ovals on the painted ornament.
**Quick Tip - Place painted ornament back into cup and place a paper plate under the cup to catch all of the excess flocking powder. You can recycle the remainder of the powder for the other half of the ornament.
5. Immediately sprinkle the Ivory Colored Flocking powder, covering the wet glue.
6. Allow to fully dry and repeat.
Project Materials:
- Rust-Oleum's Metallic Spray in Aged Copper
- Ornaments - any shape or size
- Glitter Glue
- Ivory Flocking Powder
- Paper Plate
- Plastic Cup
- Old Shoe Box
- Drop Cloth
Subscribe to:
Posts (Atom)