Showing posts with label Rust-Oleum. Show all posts

Friday, May 25, 2012

Prep & Paint Wicker

My front porch wicker chair has been in need of a little TLC. Since wicker is a day or two project, I decided to wait until spring to give it the ultimate overhaul. Prepping this wicker chair is key and I will give it extra elbow grease. I like to brush off the old paint with a medium wire brush, shake it out and then add 1/4 cup of bleach to a healthy bucket of water - with a nylon brush, I dip into the bucket and scrub down my chair, hose and then allow it to fully dry. Since wicker is wood, it tends to swell when wet so I do highly recommend that you allow soaked chair to fully dry a good 24 hours, depending on weather - it may even take 48 hours. This is a key step because you do not want to apply your primer to wet wicker. So, let's tackle this two/three day project and add that perfect dash of color with Painter's Touch 2X !


Project Materials:
*Wicker Piece
*Painter's Touch 2x COLOR TO BE DETERMINED - 2 cans
*Medium Wire Brush
*Medium Nylon Brush
*Bucket
*1/4 cup of bleach
*Drop Cloth

Project Steps:
*Using your medium wire brush, brush off loose debris & old paint
*Mix together 1/4 of bleach with a half a bucket full of water
*Using your nylon brush, dip it into the bucket and lightly scrub down the entire wicker piece, working on molded/dirty areas
*Hose off the wicker piece well with water
*Allow to fully dry - 24 to 48 hours
*Apply first coat of Zinsser Bin Primer
*Allow to dry 30 minutes
*Apply second coat of Zinsser Bin Primer
*Allow to fully cure 24 hours
*Apply first coat of Painter's Touch 2X (COLOR TO BE DETERMINED)
*Allow to dry 30 minutes but not more then 60
*Apply second coat of Painter's Touch 2X (COLOR TO BE DETERMINED)
*Allow to fully dry 48 hours before full use

Friday, March 30, 2012

Blue Lagoon Candlesticks, Saved From the Holidays!


These candleholders have served our home well and I simply hate to part with them. I have used them for the Christmas holidays all the way thru to New Years. As you can see they are a shimmering silver. So, since I'm on this recycling kick and decided to spray paint them with Rust-Oleum Painter's Touch Ultra Cover 2X in Lagoon. The Lagoon color fits perfectly right into my dining room and brings out the teal tones in my mirror. I opted to keep them all and use them for the spring - the Lagoon color does look stunning against the plain old pine mantel. Color can uplift your home and the joy of recycling is great too!

Project Materials
*Drop Cloth
*Candleholders
*Cover nearby items to protect them from spray mist
*Apply one coat of Painter's Touch Ultra Cover 2X to each candleholder
*Allow to dry 30 minutes
*Apply second coat within an hour or after 48 hours

Monday, March 26, 2012

Springtime Touches For Your Kitchen


After the long winter months come to a close, adding few touches of Rust-Oleum Painter's Touch Ultra Cover 2x in Eden to your kitchen is a sure winner! Spray paint season is upon us and I have added just the perfect amount of Eden! My kitchen had basic staple colors from my concrete countertops to the brown and gold seaglass backsplash along with crisp, white cabinets - thanks to Rust-Oleum Cabinet Transformations Kit - I stuck with the white kit and chose not to add the glaze. The protective topcoat has proven it's durability over and over again. The two stools were a light pine and added the Eden as well to tie the kitchen together.

Project Materials
*Drop Cloth
*Accessory Pieces to spray paint
*Lint free Clean Cloth

Project Steps
*Cover nearby items with drop cloth to protect them from spray mist
*Wipe off all accessories with a clean cloth and paint thinner
*Allow to dry 15 minutes
*Apply primer to all pieces
*Allow to dry 30 minutes
*Apply spray paint in Eden
*Allow to dry 30 minutes
*Apply second coat of Eden within an hour or after 48 hours

Friday, March 23, 2012

Flatware Framed Art for your Kitchen!


These faux enamel utensils were such a huge hit not only for dinner parties, but I took it a step further and made my own artwork for my kitchen! I have now made at least 40 of them for friend and family and have been customizing the colors for each kitchen. This Flatware Framed Artwork is truly simple and easy! The hardest part will be picking the perfect color from Rust-Oleum Painter's Touch Ultra Cover 2X line as well as picking the perfect backround! Enjoy your creativity and all for under $8 a piece!

Project Materials
*Drop Cloth
*Painter's Tape
*6 Utensils or flatware
*2 8X10 picture frames - glass removed
*2 sheets of scrap booking paper - customize to your kitchen
*Hot glue gun

Project Steps
*Tape off the "Eating" part of the utensil -expose only the handles
*Spray paint 3 each with Rust-Oleum Painter's Touch Ultra Cover 2X
*Allow to fully dry 24 hours
*Take apart frame and remove glass
*On cardboard mat glue on decorative paper
*Place paper into frame - facing forward - discard the glass
*Using hot glue gun, glue on your utensils
*Enjoy your custom artwork!

Thursday, March 15, 2012

Spring "Green" Tips For Your Garden

Here are a few great "Green" tips for the spring that will help you conserve water, plant herbs all year long as well as make new friends and gather neighbors to host a Community Compost Pile! You may have to offer up your yard, but imagine the benefits of that fresh soil right in your backyard!

*BE WATER SAVVY - When watering your lawn, place an empty tuna can in your grass - when it's full...you've reached your limit.

*NO MORE PESTICIDES IN YOUR VEGETABLE GARDEN - Cayenne and garlic will deter any bugs or small animals. Eggshells and coffee can be sprinkled around the base of your plants - ants, slugs & snails are not huge fans.

*COMMUNITY COMPOST PILE - Reach out to friends and neighbors and see if they are interested in a community compost pile - offer up your backyard and hand out a list of Yes and No's for the compost.

*PLANT YOUR OWN HERBS - Five plus hours of sunlight is required - moist soil also a must and consider growing them all year long by transitioning the plants indoors when fall arrives. Do not wait for frost, transition them in early fall. Find a sunny location indoors.

Thursday, March 8, 2012

Antique Sewing Box Planter


Nothing says Springtime like a planter full of violet colored pansies! I came upon this sewing table at my local Good Will last winter and have been anxious for it to make a "Welcome Spring" statement on my front porch. I love the oval shape, drawers and decided that Painter's Touch Ultra Cover 2X in Gloss Sun Yellow - added those violet pansies and WOW - what a great splash of color! I wanted to also share the piece primed with Painter's Touch Ultra Cover 2X White Primer.

Project Materials
*Unique Planter
*Drop Cloth
*320 Grit Sandpaper
*Paint Thinner
*Clean Lint Free Cloth
*Planting Soil
*Potted Pansey Plant

Project Steps
*Lightly sand down planter
*Wipe off with Paint Thinner and Lint Free Cloth
*Allow to dry 30 minutes
*Apply Painter's Touch 2X Primer
*Allow to dry 30 minutes
*Apply First Coat of Painter's Touch in Gloss Sun Yellow
*Allow to dry 30 minutes
*Apply Second Coat within one hour or after 48 hours
*Allow to dry 48 hours and then fill with soil & plants, place pansey plant on top

Tuesday, March 6, 2012

Seasonal Update for your Shed

With Spring around the corner and no hope for snow, it's a great time for that "Seasonal Update for your Shed." Empty your snowblower of gas by running it on idle until it's empty. Evaluate the front base and blades of the snowblower - it may have been hit by rust over this winter season. If so, lightly sand off the rusted areas, apply Rust-Oleum's Rusty Metal Primer. Next, to keep your snowblower true to color form, apply two light coats of Rust-Oleum's Stops Rust Brand in whatever color the base of the blower is. Stops Rust is available in over 30 colors! Of course, now you can reorganize your shed and place that cleaned up, freshly painted snowblower to the rear of the shed and pull all of the spring planters, seed and digging shovels to the front!

Tuesday, February 21, 2012

Varathane Stained Maple Table


My fantastic garage sale find for a crazy $10. I did do a ton of sanding on this table. I literally took my own advice from my blog "Sanding Tips 101". I spent about a total of 4 hours sanding - not all in one day but gave my hand a break in between. I'm going to stain this table with Varathane's Wood Stain which is available in over 20 colors and also has trial sizes available. This works well for me because I can test the colors of stains on the underside of the table and make a final decision from there. I also appreciate Varathane's stain line because I will not have to invest in a quart of stain, a pint will work perfect on this smaller round table. Varathane offers a full in line of stains, soya based, latex based, wood putty and wood fillers as well as a variety of Varathane Polyurethanes.

Now that I have the table fully prepped and ready to stain...help me pick a stain color - Espresso, Natural, Cabernet? I will be staining and sharing each picture of the step by step process on Februay 22nd. Log on and help me pick!

Monday, February 20, 2012

Sanding Tips 101

Sanding to stain is like primer is to paint. If you do a great job at sanding no one notices, BUT if your sanding jobn is minimal and weak - they will notice! No finish will hide a bad sanding job - same applies for prep and primer work prior to applying paint on the wall.

*Always do your sanding in a well lit area - it is easier to see scratches, nicks, dents or glue marks.

*Don't press too hard while sanding, keep even pressure if using a sanding tool. You do not want to dent into the wood from too much pressure.

*Sanding is not only a one step process. Sand out all blemishes which is any deep scratches, nicks or dents. Use a course grit such as 120-150 for the first layer of sanding.

*Sand in layers and sand with the grain of the wood. Change your paper often-be it on your tool or hand. The sanding does wear out and you will have uneven areas if you do not change papers often. Work your way up in sandpaper - ending with 320 grit.

*Your final sanding should be with the 320 - be sure to sand all of the parts with each sandpaper - including back ledges, legs and corners. You can wrap the sandpaper around the edge of a putty knife to fit into the back of a ledge on a table or dresser.

Thursday, February 16, 2012

Lamp Revamp - Universal Gloss Cardinal Red


I searched for a new lamp for my bedroom and just struggled with shapes, lampshades & colors. I found this gem at the Goodwill for a fabulous $2.99. I did plug it in at the Goodwill to make sure it worked, the employees were happy to loan me a bulb! I had a certain color in mind and found it - Rust-Oleum Universal Gloss Cardinal Red! It's the exact burst of color needed for my bedroom. I took it to the next level with the lampshade - leopard fringe with warm hues of brown and black! The entire project was under $22, which included the lamp shade I found at 50% off!

Project Materials
*Drop cloth
*Recycled lamp
*Painter's tape

Project Steps
*Cover nearby items with drop cloths to protect them from spray mist
*Cover cord with painter's tape
*Cover bulb socket with painter's tape
*Spray lamp with primer
*Allow to fully cure 30 minutes
*Apply first coat of Universal Gloss Cardinal Red
*Allow to dry 30 minutes
*Apply second coat of Universal Gloss Cardinal Red within an hour or after 48 hours
*Allow to fully cure 24 hours
*Attach lamp shade and insert bulb

Tuesday, January 10, 2012

Chalk Board Wine Glasses

Thrift Store Score! Silver rimmed wine glasses that I'm going to jazz up with Rust-Oleum Specialty Chalkboard Paint - on the foot of the glass! Spent just under $2 for them and the silver rim adds that bit of bling! You can then personalize each individual glass for your guests. Don't limit yourself to a name...add the brand of wine or use a nickname! Keep it creative & fun! Be sure to jump on tomorrow for my work in progess.

Tuesday, December 27, 2011

Organize that Closet...Part 2

Now to share Part 2 of "Organize that Closet"...

1. After you have organized your clothes, did your donating, contemplated on the consignments and tossed a few bad sweat pants - if you're on the fence with blouse or low riders, take a post it "flag" and stick it on the hanger. If the flag is still there next year...donate!
2. Post it your shoe boxes as well. A brief description of which shoe is the box makes less mess.
3. Never leave your clothes in dry cleaner plastic bags, it does not allow the materials of your clothing to breath and your clothes will smell like dry cleaning chemicals after a while.
4. If at all possible, do a seasonal change of closets. I store all of my winter clothes in the XX-large hefty bags and then rotate when spring and summer comes along. Don't forget to use "under your bed" as storage!

Read Part I of "Organize that Closet"

Snowflake Napkin Rings, Trivet and Votives


Crate & Barrel had these out years ago and now they are floating around in the thrift stores! I managed to round up a trivet, 2 votive holders and 6 napkins rings. All in great shape and thought I'd use them all winter long...the only dilemma? What color? With Rust-Oleum Painter's Touch Ultra Cover 2X the color palette is broad and I had a tough time deciding...I posted the before pic on facebook at PaintIdeas Angie and the winner is Satin Aqua! What could be better than light blue snowflakes in the middle of winter?

Project Steps
*Find a spot safe for spray painting - cover nearby items with drop cloths or old sheets to protect them from spray mist
*Lightly spray Rust-Oleum Clean Metal Primer
*Allow to fully dry
*Spray two light coats of Rust-Oleum Painter's Touch Ultra Cover 2X in Satin Aqua

Project Materials
*Metal Napkin rings, votives & trivet
*Rust-Oleum Clean Metal Primer
*Rust-Oleum Painter's Touch Ultra Cover 2X Satin Aqua
*Drop cloths

Winter White Picture Frames


Thanks to one major retailer for clearancing these solid wood picture frames for $1.54 each! I will say that I did not take to the sage green scrolling around the front frame. So as with everything, I decided to invest $3.97 on a can of Rust-Oleum Painter's Touch Ultra Cover 2X in Satin Blossom White and magic happened!

These frames went from one sagey style to a winter wonderland of pictures. I am thinking I will be adding winter pictures of the kids and dogs sledding and making all of those snowmen!

Project Steps
* Find a spot where it is safe to spray paint; cover nearby items with drop cloths or old sheets to protect them from spray mist
*Wipe off picture frames, remove glass from fronts
*Apply Zinsser B-I-N Primer - allow to cure one hour
*Apply wwo light coats of Painter's Touch Ultra Cover 2X in Satin Blossom White
*Allow to fully cure 24 hours
*Fill with fantastic winter pics of family fun

Project Materials:
*Picture frames in need of a face lift
*Zinsser B-I-N Primer
*Painter's Touch Ultra Cover 2X in Satin Blossom White
*Drop cloths
*Fun, winter pictures

New Year's Eve Centerpiece


Ring in "2012" with all of those unwanted and outdated vases that have been just sitting around in the basement! I did add a few filler vases from my local Goodwill for a grand total of $1.25 for all four vases! My big purchase was the Universal spray paint - three cans and still have plenty leftover for yet another project! I added the tin house numbers for under $7.

Consider adding in fresh flowers such as white peace lillies or simple red roses! Adding candles inside the "2012" front vases luminates the numbers nicely. If you wanted to keep it simple, you can just spray the four vases and glue on the 2012 and use that as a hostess gift as well!

Project Steps
*Wash & Rinse your vases. Dry well
*Cover nearby items with drop cloths or old sheets to protect them from spray mist
***QUICK TIP: Stuff each vase with newspapers so you do not spray the inside of the vases. This allows you to fill with water & fresh flowers or candles
*Apply Universal's Primer - for all surfaces
*Allow to dry 24 hours
*Apply two light coats to each vase in Universal's Gloss Black, Gloss White & Metallic Titanium Silver
*Using a hot glue gun, glue on the 2012 numbers to the front of the vases
*Fill with candles & flowers

Project Materials
*Various Vases
*Drop Cloth
*Universal Primer
*Universal Spray Paint in Gloss Black & Gloss White
*Universal Spray Paint in Metallic Titanium Silver
*Newspapers
*Tin Numbers 2012
*Hot Glue Gun
*Fresh Flowers & Candles

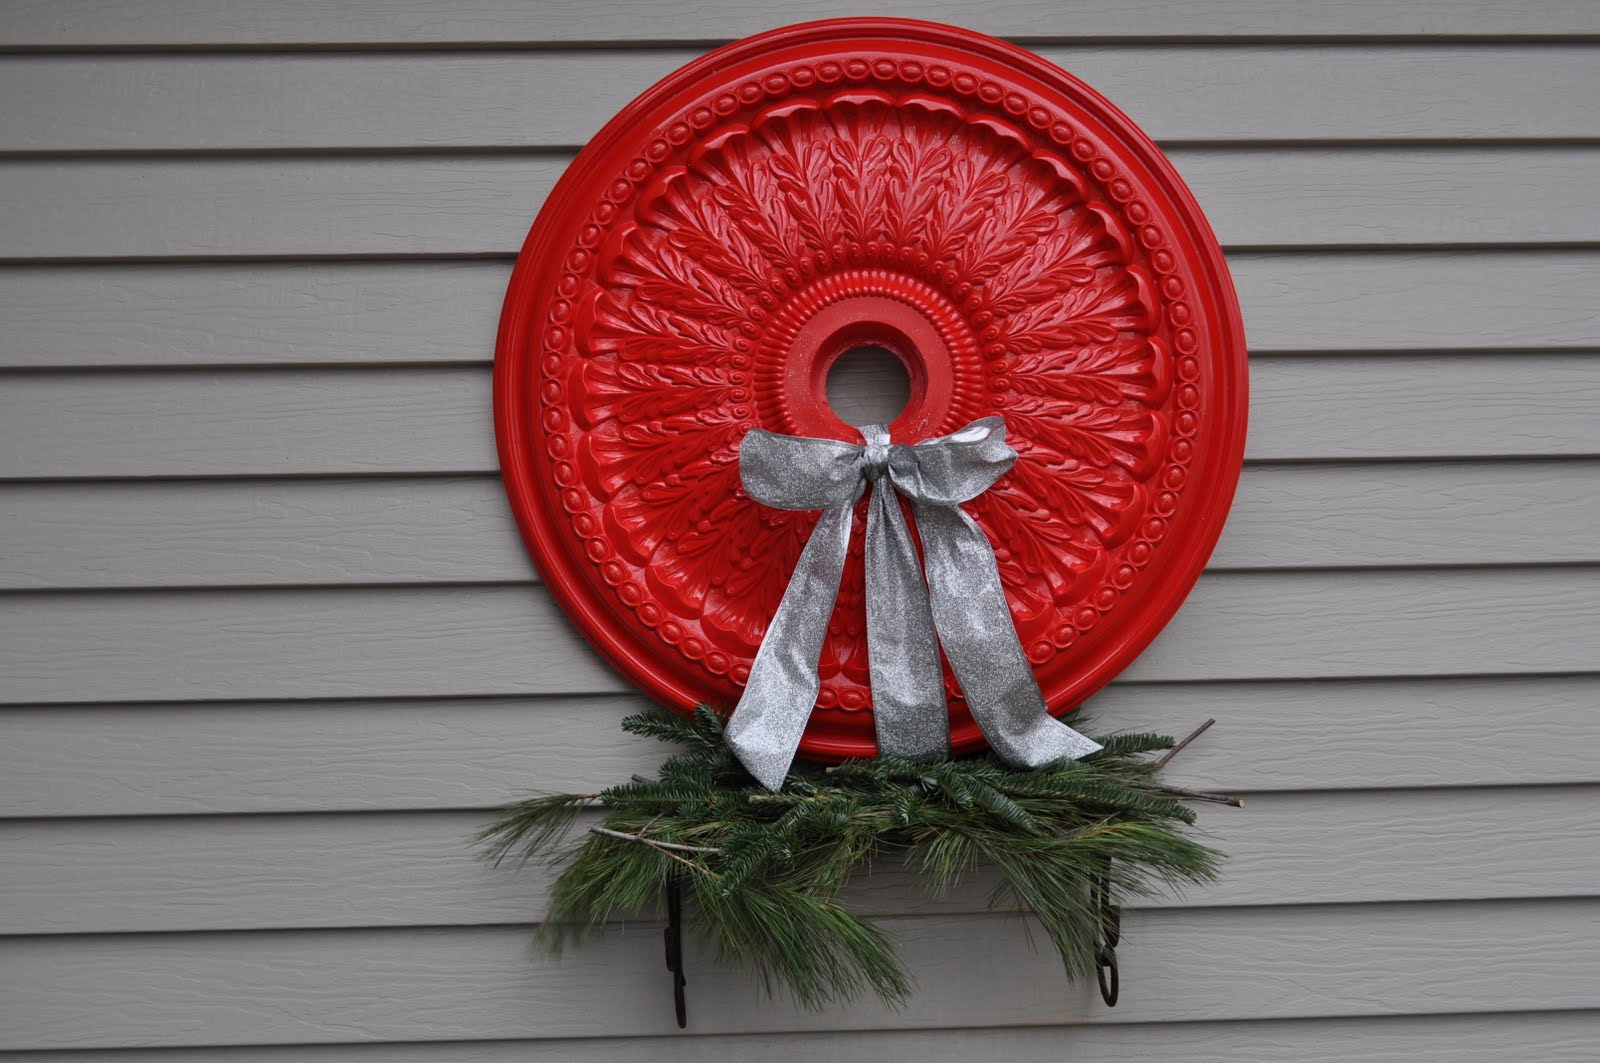
Thrift Store Score - Cherry Red Medallion Wreath

This is my "Thrift Store Score" for the month. I grabbed this builder's ceiling medallion for $4 at my local Good Will! I was looking to make a bold statement and went with Rust-Oleum's Stops Rust in Cherry. Even though the medallion is not metal, I was determined to use the Cherry color - it worked and wow is it stunning!


Project Steps
1. Wipe off medallion with paint thinner - this one had lots of dirt in the crevices
2. Wipe off with a clean rag
3. Spray with Zinsser BIN Primer
4. Allow to fully dry one hour
5. Apply two to three light coats of Rust-Oleum's Stops Rust in Cherry
**Quick Tip - Be sure to allow at least 35 to 40 minutes in between coats - I even applied one coat and after 48 hours went back and applied the final two
6. Once fully dry - about 24 hours tie on decorative ribbon

Project Materials
- Decorative Ceiling Medallion (mine was 52")
- Zinsser BIN Primer
- Rust-Oleum's Stops Rust in CHERRY
- Decorative Ribbon
- Paint Thinner

Friday, December 16, 2011

Frosted Sea Glass Menorah


Enjoy your Hanukkah this season with a homemade menorah! Customize your very own Festival of Lights with a few glass bottles, Rust-Oleum's Specilalty Frosted Seaglass Spray Paint and blue candles.

Projects Materials
- 9 Glass Bottles - recycling is great!
- Rust-Oleum's Specilaty Frosted Sea Glass spray paint
- 9 Blue candles
- One Decorative Star of David Patch
- Acetone

Project Steps
1. Wipe off all of the glass bottles with acetone
2. Cover nearby items with drop cloths to protect them from spray mist
3. Lightly spray on 2 to 3 coats of the frosted sea glass to each bottle
4. Wait 20 to 30 minutes in between coats
5. Allow to dry a full 24 hours
6. Glue on Star of David Patch
7. Wedge in Candles

Happy Hanukkah to All!

Thursday, December 15, 2011

Gold Metallic Angel Ornaments

For my weekend craft warriors - these are perfect to make in mass amounts with our without kids! Great for gifts to your teacher, mailman, community worker, etc.

Project Steps:
Spray in a covered area - to avoid oversprayLine up the mini wooden pots and spray them all with Rust-Oleum's Metallic Gold Spray Paint
Two light coats will be perfect - 30 minutes in between coats
Line up the 1" wooden balls and spray paint them with Universal's Satin White - two light coats - 30 minutes in between coats as well
Allow to fully dry 24 hours
Glue white head onto inverted pot. Dress up with ribbon for wings, straw for hair, white pipecleaner for halo and hot glue on the back an ornament hook!

Materials Needed:
Rust-Oleum's Metallic Gold Spray Paint
Universal's Satin Spray in White
1" Mini Wooden Pots1" Wooden Balls
Decorative Ribbon
White Pipecleaner
Natural straw for hair
Hot Glue Gun
Ornament Hooks

Thursday, December 8, 2011

Natural Birchwood Winter Centerpiece

This natural birchwood centerpiece can take you right through the winter season. Best part of this project is that you can change the ribbon and decorative butterfly to co-ordinate with your settings!

Project Steps:

1. Cover nearby items with a drop cloth or old sheet to protect them from spray mist
**Quick Tip - Lay birchwood logs into an old box and spray inside

2. Spray two to three coats of Universal's Pure Gold

3. Spray each coating within one hour of each other

4. Allow to fully cure 24 hours

5. Wrap three logs with decorative ribbon and add on your favorite or themed adornment


Project Materials:
- 3 Birchwood Logs
- Universal's Pure Gold
- Decorative Ribbon
- Adornments to decorate along the log

Stunning Holiday Silver Wreath


What a great way to welcome your holiday guests at your front door! Turn a ceiling medallion into a retro wreath and add that perfect zebra ribbon as a final touch!

Project Steps:
1. Cover nearby items with drop cloth or old sheets to protect them from spray mist
** Quick Tip - you can use an old box to spray in as well - lay medallion into box

2. Spray two to three light coats of Rust-Oleum's Metallic in Silver

3. Be sure that each coat of paint is within an hour of each other

4. Allow to fully cure 24 hours


Project Materials:

- 20 Inch Ceiling Medallion
**Quick Tip - check your local home/hardware centers clearance section for these

- One can of Rust-Oleum's Metallic in Silver

- Decorative Ribbon